Friday, March 29, 2013

Raleigh Dawn Tourist Test Rides Continued

I like to extensively test and compare the rides of the various bicycles I own. Each has its own character and unique element set on the road.

The Raleigh Dawn is no exception. It has the feel of a "baby roadster"- rod brakes and an upright riding position, but in a smaller and closer together form. I have found it striking how low to the ground the bottom bracket seems to be. For some reason it gives me the impression that it actually is lower to the ground than my Sports model. I will have to measure them at some point, perhaps it's just my perception. That said, it really does seem to have a "low to the ground" feel. I took the Dawn out a few times on my usual run down to the nearby trails, swamps, and back roads.


This bike really is perfect for the person who wants a rod brake Raleigh with most of the roadster characteristics, but with a smaller wheel and frame size. It's a nice hybrid of Sports and rod brake roadster characteristics.

I will also add that, in stock form, it has the same "gears are too high" feel. The stock Raleigh AW, and in this case AB, cog is an 18 tooth dished type. All of the cogs I've seen are well-made and seem to have a long lifespan. However, the gearing on these bicycles is too high in that form. I ride in a very flat area, but even there, I find I rarely hit third gear. Third is truly a downhill overdrive with the 18 tooth cog.

Fortunately, it is not difficult to change to a 20 or 22 tooth type. You simply (1) remove the rear wheel, (2) use a small, flat bladed screw driver to pop off the ring-shaped spring, (3) remove the 18 tooth cog, (4) slide the new cog on using the three nub splines to line up, and (5) pop the spring back on over the new cog and return the wheel to the bicycle.  You will likely need a new chain, and I suggest the Sachs SRAM nickel finish bushingless type. They are very smooth and easy to work with a standard chain tool.


Tuesday, March 26, 2013

Hercules 3 Speed: Bicycle Fender Repair

 Front Fender Repairs:

Today was chilly, so I got some work in the shed done on the Model G. This past weekend, as you may recall, I stripped the front fender down to the original black paint only to find it had been scored to allow a home spray paint job to take place. I worked the fender back into better shape here and there by hand, then set about the cosmetics.


Today I set about cleaning up, at least mitigating the scratches. My goal is make the part more presentable while also preventing any sort of rust build up in the scratches.  Here you can see the part in daylight as it will naturally appear on the road.


My method was not particularly high tech. I thinned some black oil-based paint, then used a rag to rub the thinned mixture onto the fender. I continued to buff until the paint accumulated in the scratches and rubbed off the intact paint.  On a closer look, you can see the texture of those small but present scratches.

The results are ok, nothing spectacular, but then I've got some pretty serious scratches on the part. That said, it came out in, what I think is, a presentable manner. It will never be perfect, but perhaps the repair/restoration of this bike will be as a cleaned up relic and not a totally redone item. The color matches reasonably well, and I've gotten sort of used to dealing with black paint over the years.


My philosophy with vintage bikes is to go with what you've been given and to keep it as original as possible while still being practical. I'm not in it for a dead-on total restoration, and then I'm also not waiting around for mint, 'NOS' originals. I think you have to play the hand your dealt and adjust where you're headed with the project based on what turns up. In this case I'm headed back down the "presentable, used/antique" type route. I usually end up there anyway.


Raleigh Dawn Tourist Ride, and Dating Danish Market Bicycle


While letting the fender dry, I took a half hour ride on the Raleigh Dawn. It's the same as it was before. I still need warm weather to finish and install the chain case. It's a nice looking bike and I really like the green color.


The paint cleaned up pretty well, and the Brooks saddle looks nice on there.

 Here is the give away that the bicycle was exported to Denmark. That country had a special system of marking bicycles being brought to market. This number on the side of the seat tube indicates the bicycle was imported in 1965, which jives with the hubs being December 1964 production. The bicycle was a Nottingham Raleigh produced for the Danish market specifically.

For more on it: Dating Danish Market Bicycles


Monday, March 25, 2013

1935 Hercules 3 Speed Model G

If you caught my previous post, you may have noticed that I have yet another project. It seems like just as I start finishing up one bike, another comes along and keeps me doing repairs perpetually. If the garage had a crapper and heat, I'd be living there...


Anyway the latest is a mid-1930s Hercules 3 speed bicycle. A fellow familiar with them posted a message telling me it probably is a "Model G" "All Weather" or "All Black" bicycle. The Model G was apparently the basic Hercules 3 speed of the pre-war period, with mostly black painted rather than chrome plated parts. He said it likely had a chain/gear case originally but that the part was likely removed.


The bicycle has a 24 inch frame and 26 x 1-1/2 (650b apparently) wheels. The rims are Westwood and painted black like the rest of the trim. Obviously, the bike then is a rod brake model. The parts I'm missing presently are a seat,pedals, and handgrips. I will be replacing the tires. I believe the kickstand is not original as well, so I may end up sourcing a better one of those. I have the seat post and front rod brake set up despite them being off the bike in the above picture.

The rod set up at left is old-type side mount rear linkage. Raleigh used center yokes generally, but Birmingham Hercules and Phillips apparently used a side mount.


The hub is a Sturmey Archer Model K with a 1935 date code. The Model K predated the long-running AW. I got a couple close-ups of the hub stampings. If you want to know more about the model K, try here:


At right is the K 5 code.


Here is the Sturmey Archer scroll label on the hub.


 The front hub has no markings, but does have a metal oil port on it. The Model K rear is missing its oil port. I'm probably going to try an AW-type rubber port for it. The metal ones leak. Many of the AW parts supposedly interchange with the K, though there are a few exceptions (the clutch in particular). Fortunately, I tested the K and it seems to work fine.


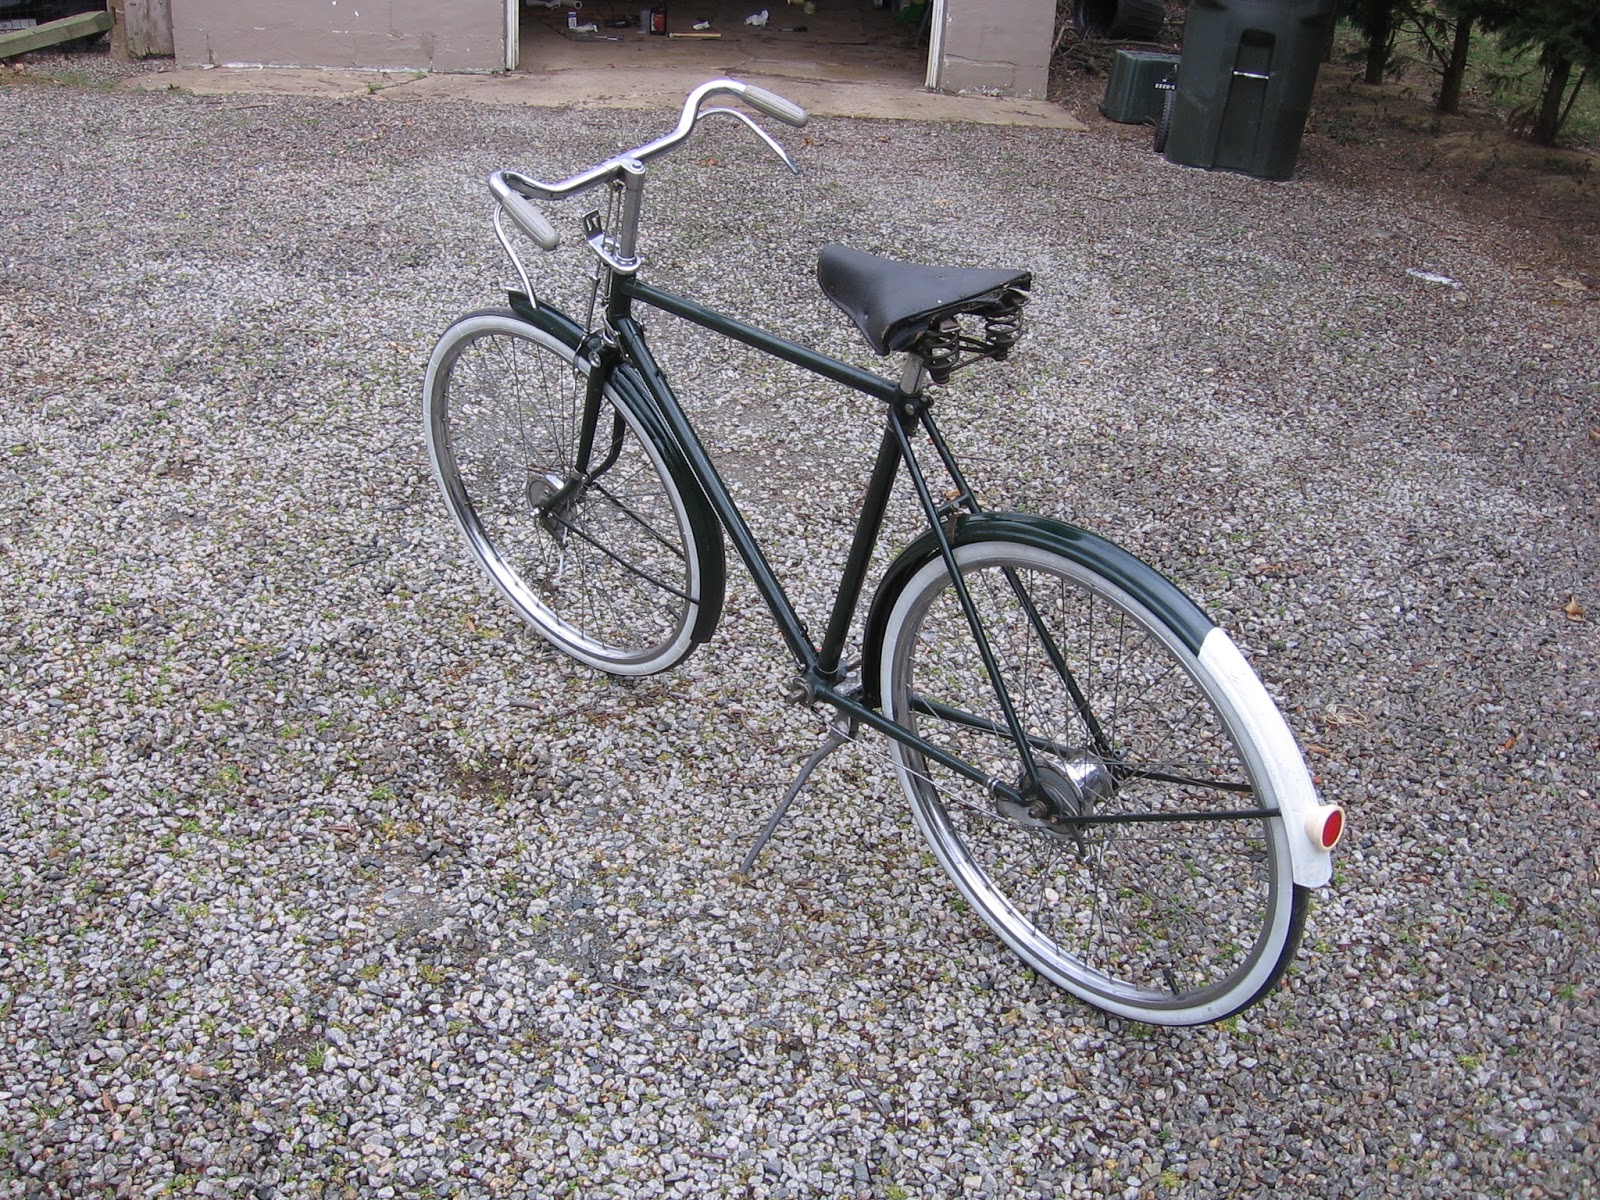
 I have begun to take the bike apart to clean it. I set it on some cardboards on a placeholder, junk seat. The Hunt-Wilde handgips are going to go too, so I'm not concerned about them.
 On closer inspection, you can see where someone has done a home paint job on this bike. It turns out they primed, then spray painted the over the original paint. Then later on, they housepainted over the spray paint. The finish is sort of a mess. That does not necessarily mean the original paint is lost though.

I started by applying some Acetone to the house paint and letting it compromise that layer. I then took a Dremel polishing wheel on the slowest speed and began to work. Sure enough, off came the house paint and the thick layer of home spray job. Underneath was a layer of white home job primer, again a messy affair. However, underneath all that is the original black paint. The orignal paint was apparently scratched and scored to a degree before  priming with the home job.


Above, you can see the front of the front fender. The original paint is the shiny, even black. The home job being removed is that grey colored, sort of marshmallow-like stuff with white edges. There is actually a fair bit of original paint left, though contending with the scoring will be a pain. 

 Here is the front fender after removal of the home job. There's a fair bit of black left, though you can see the scratches where the scoring was done for the home spray job. My suspicion is that someone with a bit of paint knowledge did this, because they at least knew they had to "rough up" the surface to do an overspray, and they indeed applied a home spray primer. This doesn't make life for me much easier.

 More of the front fender. You can see the scoring. I suspect that being black and actually still being pretty dark and not faded, I will be able to fill and level the score lines and make the original finish presentable again.


 This afternoon I removed the rear fender, which also has the spray job and the house paint on the outside. The insides of the fender are the original paint. Yet another hallmark of a home job- just the reachable areas were done.
Here's the rear fender on the bike. My belief is that the bicycle never had a white tip on its fender originally. The catalogs describe the Model G as the "All Black" "All Weather" model. The pictures show all black fenders and no white. My guess is that the home job spray guy saw other English bikes and wanted some white of his own. Time and effort will tell what state the original paint is in underneath it all.

Saturday, March 23, 2013

Touch Up, New Project

A couple people have asked for shots of the touch up areas on the Raleigh Dawn. I tried my best to get a couple close ups, and do a little photoshop outline to show where the paint is. The primary difference is that the touch up paint has a little more shine to it than the original. Of course, it's much newer. I suppose I could buff it down a bit dull to match better, but then as it fades it will eventually come to match the rest of the paint anyway. The color is a nice match because it was digitally done at a good paint store near me.
At left is the unaltered shot of the touch up. The touch up paint is on the crest/fold of the front fender right behind the ornament.
 At right, I have outlined the area. You can JUST see the difference in the shine and texture. It's never perfect, but it's not bad either. The shot is a little dark, but you can still make out the area.


At left is the seat stay. You can see a dent where the original owner had attached a rack but over-tightened the clamp. I had to touch up that area, and again you can see a little difference in shine and texture. The color matches well though.


At right, I have outlined the area just to see. You can see how the touch up has a little different texture and shine compared to the original, surrounding paint.


New Project: Hercules Model G Roadster (1935)


I had promised not to take on any more projects until I finished the chain case on the Dawn, and perhaps recover the New World saddle. Both are waiting for better weather because they require chemical drying in the shed (in one case paint, in another adhesive).

However, a 1935 Hercules Model G has been for sale on a website I visit. I had originally passed it off as too large, and just another big project. However, I came back to it and looked at it again. The dimensions just barely fit me, as it's a 24 inch frame on 26 wheels. It's at the big end of my fit, but still comfortable enough. I sent the fellow selling it a message and he still had it, so I caved and bought it.

The model is known as the "all black" because it featured reduced chrome and substituted that plating for black paint. Even the rims were just painted black (they developed wear lines where the brake pads rub). The handlebars and brake bits were all black. The cranks and chainring are plated still though. Moreover, the bike is complete minus the chain case and saddle. It even has the original Sturmey Archer Model K hub, quadrant shifter, and quadrant cable/pulley.

I was able to locate an original, Hercules chain case I believe will fit and match the bike. That is on the way in the mail. Sadly, the bike itself has been spray painted, and then house paint applied over the spray job. It's going to take careful scrubbing and stripping to get back to the original paint, which I will then have to clean up.  The tires are 26 x 1 1/2 and seem to be the 650b size. I have a Brooks saddle I can eventually use on it, and I'll have to find some pedals and proper grips.


Tuesday, March 19, 2013

Raleigh Dawn Tourist Test Ride

The Dawn is finally on the road. I still have not completed the chain case for installation, but I can still ride it open.

Over the past couple of days, I have installed the cranks and cotters, installed the Sturmey Archer cable, housing, and hardware, and set up the wheels and brakes. I also swapped on my Brooks roadster saddle.


Many people anguish over cottered cranks, and often for good reason. The cotters can become stuck, refuse to come off, or be a problem going in (less common). I opted for the Bikesmith Cotter Press and bought with it 2 pairs of Grade "A" Raleigh cut cotters. They were a great choice- the cotters are leagues better than the normal ones you see on the market, and they come pre-filed for a very close fit into the Raleigh cranks. In this case all I had to do was grease them, and press them on with the cotter press. The cotter press was very smooth and powerfully operating- a great tool.

http://www.bikesmithdesign.com/


I then installed the chain. I opted for a Sachs SRAM power link chain. These chains are great- very smooth, very pliable, and very durable. I have actually swapped all of my 3 speeds to them. The first time I used one, I noticed a vast difference in the feel of the drive train. It really smoothed out my Sports. So, I opted to add another to the Dawn. Once the chain case is on, I'll have all the look of the vintage roadster, but with the chain performance of a really nice, modern chain.


The Sturmey Archer cable is the new type, with the pinch bolt. I opted for the reliability of a new cable, though retained the old hardware and mounts. The installation was not hard.

The brakes are a Sturmey Archer AB in the back and a BF in the front. They give moderate stopping power by vintage standards, but in particular are very smooth. They don't give that sort of "lurching" feel that calipers can give sometimes. The brake tension also gives a very linear "stack". The brake handles don't become hard all of a sudden like on some calipers. Rather, they give a very gradual build up of tension. It's certainly a unique combination of features.


The ride qualities are interesting. It has quite a low bottom bracket and the frame feels much like a Sports (it may actually be a Sports frame). However the DL-1 style handlebars and rod brakes give it a hybrid feel. It's sort of a "baby roadster" sort of design, which is pretty interesting. The Duro tires seem to give a little cushier ride than the Kenda ones on my Sports. Both are the ISO 590 size (26 x 1 3/8 English).  Right now I have an 18 tooth cog on the back. I may up that to 20 or 22. I have a couple bigger spares here.

Sunday, March 17, 2013

More Progress on Raleigh Dawn Tourist

Another grey, rainy weekend day means more time in the Bike Shed, and means more work on the Raleigh Dawn Tourist.

Today's jobs included patching up the white paint on the rear fender, finishing up the front end, adding the lamp bracket, installing the rear reflector, and cleaning up the fender braces.


 As you may have noticed from the shots the other day, there was a big spot of missing paint in the upper right portion of the white of the rear fender. I got to patching that today. I used some basic Testor's oil-based enamels for the patch. My process is to: (1) thin the base paint [in this case semi-gloss white], (2) mix colors until an acceptable matchi s made, and (3) apply the paint in thin layers thereby building them up to match the stock paint.
 The match isn't bad, though it's not perfect either. Ideally, I would take the part to a paint store, match the paint with a machine, then purchase the paint. For the green, that's not a bad idea because there's so much green on the bike. Furthermore, the chain case will need to be sprayed green. However, if I did that with the white, I'd have way too much left over. It's basically a huge waste at that point. So, I settled for a home brew match. The reflector is the original and shows a little age.

Here's the overall shot of the bike today. As you can see, I added the lamp bracket and re-adjusted the brakes. The front part of the bike is basically done, aside from small adjustments and tweaking as I ride it.

Here's a little better shot of the front end. I do have a lamp set for it, though it's not in the best shape. I also have a solo, battery-powered bullet lamp that captures the look of the originals, but in a pure battery format.

However, the more I think about it, the more I may just leave it as-is. None of the lights I have do a great job, and I'm not really interested in spending a lot of money on modern lamps/retro lamps to add lights. I don't ride when it's dark because there are just too many potholes and places to damage the front end of the bike. The bike also looks fairly nice in its stock format, without lamps.

More on Freeing a Stuck Bicycle Seat Post

I've had a couple messages about the method I used to free the New World seat post. This was the Kroil and small torch method.

http://bikeshedva.blogspot.com/2013/01/freeing-stuck-bicycle-seat-post.html

The method I used was really a last resort, or near last resort for a very difficult seat post. There are other things you can do before you reach the heat and Kroil phase. Sheldon Brown's website discusses the methods in more detail, and in the order to be tried.

I detailed the Kroil and heat method merely as an example as a really difficult case- it's not where you'd go first. However, if you have a very, very stuck post, you can go that route. It applies only to steel posts, like that on the New World and other vintage bikes.

http://sheldonbrown.com/stuck-seatposts.html

 "If nothing else works to free up a steel or titanium seatpost, the next-to-last resort is to heat the seat tube up with a hair dryer or propane torch. This should be done with great care so as not to do too much damage to the paint. You should work as fast as you safely can, because you want to heat the seat tube so that it will expand, but if possible you should quickly put the torch down and start pulling on the saddle before the heat works its way through the seat tube and makes the seatpost expand too. The torch technique is worse than useless when you are dealing with an aluminum seatpost stuck in a steel or titanium frame, because aluminum expands twice as much as steel, and 2 1/2 times as much as titanium for the same increase in temperature. In fact, the exact opposite technique will often do the trick for aluminum seatposts -- cool the seatpost down as rapidly as possible. The contents of a CO2 tire inflation cartridge applied inside the seatpost can shrink it down just enough to do the trick. [As will dry ice, which is also CO2, and can get the seatpost colder-- John Allen]" (from the above Sheldon Brown link)


The above link is a good reference and certainly worth trying.

Saturday, March 16, 2013

Raleigh Dawn Tourist - White Wall Tires, Wheels, Rod Brake Progress

Today was a mixed bag: part sun and part rain. I got a ride on the Schwinn New World in, but also got some time to work on the Raleigh Dawn Tourist.


As you may remember, the wheels and tires had been cleaned up and ready to go. I reinstalled the fenders and wheels today. They are finger tight right now- just mocking the bike up so that I can finish the project off.

The chipped paint on the rear white stripe will need to be patched up next.


 The white wall tires are Duro brand- basically oriental tires made for a reasonable price. They're made in Thailand, and the quality is not bad from what I can tell. They have a traditional road tread. The original tires would have been Dunlop "White Sprite" type tires, which were also white walls.


The chrome of the handlebars looks pretty good, and the wheels cleaned up moderately well. There are some imperfections, but then again I'm not doing a full "restoration". I'm doing my usual "clean up and preservation".

Earlier I had mentioned needing to put together some sort of set up for the front rod brake connection. The previous owner had acquired a generic, threaded rod from a hardware store. The piece fit properly but needed to be milled down.

I milled it down by putting the rod in the chuck of my power drill, then turning the piece against a stone, then sandpaper of gradually finer grits. The effect was  makeshift lathe. Once I had turned the rod down to the profile of the other rods on the bike, I put it into the existing hardware and gave it a little snake to fit it right in between the fork blade and the reaction arm of the drum brake.

It's coming together. Yes, those white walls really add a nice, period effect too. I'm glad Duro is making these.

Friday, March 15, 2013

Almost Spring

Today made it up to 65 degrees with lots of sun.


 A woodpecker was at the bird feeder.


The small flowers are starting to appear on the fruit trees.


That certainly called for a ride. I took the new work out for a little over an hour this evening, and it performed in its usual lively manner.


I never thought a single speed freewheel could give such nice performance, but the terrain around here really seems to go perfectly with this particular bike's gearing. The saddle cover is getting kind of worn, but I'll have to do a leather re-cover at some point in the future.  I took a few shots of it leaning against the bike shed wall.


One of the chief purposes of a bicycle is freedom. With it comes the freedom to travel at a particular, often slower pace, and to take in the surroundings. The spring goes well with them because they allow the rider to see the transitions of the season.  They allow the rider to become free to experience the world.


Sunday, March 10, 2013

Tweaking and Breaking In Caliper Brakes

Today was a ride day, with warm weather again in the 60s. I've been riding the New World for a little over a month now, and in that time I've gotten used to its zippy and comfortable ride. The bicycle is deceptively light; it looks like your basic utility bike but actually is quite peppy and easy to push along.

Bicycle brakes require periodic checks and adjusting. The pads on these are brand new, generic pads. The calipers are pretty basic and take normal cables. The pads were new a month ago. This means that they've had about a month to break in and begin to shape themselves to the way in which they hit the rim.


 After awhile of riding, you want to check your new pads to make sure they line up vertically on the rim (too high and you hit the tire, too low and you lose braking surface) as well as horizontally (too far from the rim and you run out of lever travel, too close and the rim rubs the pad surface all the time).

In this case I found my horizontal distance was fine still, but I needed to raise one of the four pads just a touch, as the bottom of it seemed just slightly below the rim. This was easily enough done with a wrench and some care. It's good to run periodic checks on these things, because they do tend to change a little as the pads break in.

Saturday, March 9, 2013

Return of Warm Weather

Today reached the low 60s and was sunny. The wind was modest, which made it a very nice day for March. I brought out the completed bikes for a little group shot set. The blue is the 1949 Columbia Three Star Deluxe, the black is the 1947 Schwinn New World, and the green is the 1974 Raleigh Sports 3 speed.