Monday, November 27, 2023

Paint: Matching Aged White

If you've been working on old bikes, and particularly older British bikes, for awhile now, you probably have run into a case where you want to touch-up white paint (often on a rear fender). You probably tried "white" and found it actually did not match. 

 This is because there is a subtle and gradual fading that goes on with vintage white paint. What may have started out as "white" in 1950 or 60 from the factory may now be closer to an egg shell or even a cream type color. Sometimes there are subtle, mint green tones, or yellow tones, or even some staining. 

Assuming the paint is in workable condition, I suggest starting with a light cleaning and polishing. You want to establish a "baseline" color and degree of gloss. I use NuFinish or similar car polish to bring out what the real color and gloss should be. I try to get the condition consistent across the entire part.

 Next you need to start mixing your paint. I suggest a decent oil-based paint and I use the Testors model paints that come in the small glass bottles. They are inexpensive, easy to mix, and come in manageable quantities. You'll usually start with gloss, semi-gloss, or flat white, depending on how glossy your original paint condition is.

Take a disposable eye dropper and put a few drops (count them out) on mixing surface. Next, closely examine the original surface paint you are trying to match. Is it faded a little yellow? Or is it more of a mint green hue that has begun to come out? Does it have some tobacco type staining compared to your little pool of pure white paint? You'll have to decide.

Lighting here is important. I use two sources of light when trying to match paint: a cold, white colored LED accompanied by a regular incandescent type bulb. I find that LED tends to exaggerate difference in color not visible under a regular light bulb or even under sunlight. If it looks good under the LED, it tends to look even better outdoors.

Begin to mix in very small quantities of your tinting color. I usually have bottles of Testors light ivory (yellow tint), light brown (brown/tobacco type staining), and cream (yellow-pink tint) around. I start with less than a drop of my tint color - I usually take a tiny swipe with a very small brush and work it into the white. I keep tinting very gradually until I have a match of dry new paint to dry original paint.

 Below is how I mix small quantities of paint. I use the clean bottom of a clear glass jar as a mixing surface. I keep a little paint thinner nearby to get the right thickness of paint. I keep my white and my "tinting colors" handy. Testors paints are designed to mix smoothly, and I think they're a great choice for this work.


Here's an extreme example: an all-white set of fenders that I'd like to put on a 1950s Raleigh Lenton. Most of the time, you're just touching up the lower part of the rear fender, but here the entire thing is white. They were in good condition to start with and touch-up has made them even better. These are steel fenders with original paint that has been touched up. In this case the tint was a very small amount of cream on the rear fender and a very small amount of brown on the front fender in stained areas. The result is not bad at all.


Sunday, November 12, 2023

Birmingham Headset - 1951 New Hudson (BSA Era Production)

Having more or less finished the 1957 Schwinn Traveler, I've moved on to a very nice 1951 New Hudson Silver Arrow bicycle, produced by BSA. The Silver Arrow is a clubman style bike with 531 main tubes in the frame, 26 x 1-1/4 wheels and celluloid fenders.

I've done some preliminary cleaning, as well as cleaned and repacked the bottom bracket. There is nothing special about those jobs. It's a process I have covered many times before. The clean and re-pack process for the bottom bracket is the same as any run-of-the mill Raleigh Sports or similar English bike.

So let's get into something trickier: the BSA-style or "Birmingham" style headset. Whereas the common Raleigh headset takes 25x 5/32 inch loose bearing balls in each race, the Birmingham headset uses 30x 1/8 inch balls. The Birmingham headset also uses an upper race "insert". 

Let's take a closer look:


Above is a top view of the head tube. As you can see, the frame does not include an integral bearing race. Rather, the head tube has  "bowl" in it, which in turn houses a removable top race.

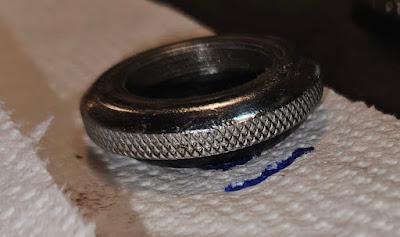
Above you can see the top race components. On the left is the insert that will sit in that "bowl" in the previous picture. At right is the top ring that screws down. 


Above are, again, the two top components. The insert for the "bowl" has grease and the 1/8 inch bearing balls in it. It will hold 31 balls, but tends to bind if it is completely filled. It will be smoother with 30 balls, which is full minus one ball. The top screw-down ring also has been greased.


Above is an illustration of how the two will go together. The insert will sit in the head tube "bowl" and the screw-down ring will ride on top.


Above is the insert with the balls sitting in the frame "bowl". I tried a full insert of 31 balls initially, but it went much better with 30x 1/8 balls (again, full minus a ball).


What about the bottom of the headset? Well, the bottom is conventional - the frame cup is pressed into the head tube as normal. However, keep in mind you're using 30x 1/8 balls,  not the usual "Raleigh" type 5/32. 


And above is the fork crown race, also conventional except that it takes the 1/8 inch balls.


Above are my crude notes drawn in Sharpie on a paper towel while working. This is as much to remind myself of how to set up this headset as it is any other purpose. I'm very accustomed to the Raleigh system of 25 balls at 5/32 apiece. I needed a note to myself that this Brimingham headset likes to run 30x balls at 1/8 inch apiece.


And a quit shot of the New Hudson head badge. Pretty cool...


Saturday, November 4, 2023

1957 Schwinn Traveler Three Speed: An "In-Betweener" Schwinn Light Roadster


I have finally finished my rather gradually-conducted rebuild of a 1957 Schwinn Traveler tall frame bike. This three speed dates to an unusual period in Schwinn touring bike production. I like to think of this era of Schwinn three speeds as "in-betweener" bikes. They came after the well-known "wing theme" Schwinn and before the equally well-known Schwinns that had the gold lettering and ornate tri-color graphics. These bikes with simpler graphics tend to be less common and less well-known. They're still worth a look though.


For a brief period in the mid-1950s, Schwinn used these rather simple graphics on their bikes. They look like they belong on an 1980s-90s era bike, but are in fact from the mid-1950s. These graphics came after the ornate "wing" theme graphics of the early 1950s but before the ornate gold and tri-color graphics of the late 1950s and early 1960s.

Another interesting feature is that this bike comes from the tail end of the period when Schwinn used many fillet brazed joints around the seat mast, and the torpedo tubular fork up front. After this, three speed Schwinn touring bike frames had more welded joints, and had flat "ashtabula" type forks in front. 


The brake calipers on this bike are also "in-betweener" parts: they came after Schwinn's use of the 1950s-era "Weinmann" inscribed brakes, but before the more common brakes with "Schwinn Approved" in cursive on them. These have "Schwinn Approved" in a simple block inscription. The brakes are Weinmann 810 models made of aluminum. The brake levers are common 1950s era Weinmann red dots.


For the most part though, this is otherwise a nice, straightforward three speed from the 1950s. It has a Sturmey Archer AW rear hub (I replaced the 1957 SW with a 1957 AW alloy model), chrome plated steel Schwinn S6 rims, Torrington double-butted spokes, and a Schwinn script front hub. Fenders are the always eye-catching Schwinn stainless types with a fin on the front fender. I gave the fenders a mirror polish on my polishing wheel, with final finish done by hand.  


 The photo above reminds me I need to wipe all the hand prints off the fenders as the next thing I do. All those smudge spots are finger prints from working on the bike...

It has the classic Schwinn one-piece crank with clover sprocket. Gear ratio is 46 teeth in front and 22 teeth in back, which is a pretty forgiving ratio that I enjoy for general purpose riding. The shifter is a Sturmey window type that I rebuilt a couple of years ago (if you've never used a freshly rebuilt and cleaned shifter with a good spring, it's something worth trying).

This 1957 model is a beautiful green color similar to that on my 1959 Schwinn Traveler. Over time, these two-stage automotive-style colors have grown on me. They probably look kind of gaudy to British or European three speed purists, but I've come to appreciate their mid-century, American look.

My usual choices are present for lighting, saddle, and tires. The rear light is a Soma bullet/torpedo LED, which goes great with any old school American bike up through the mid-1960s. The front is a Kiley LED chrome bullet, which is great for any old style three speed bike.  Tires are Kenda white walls. A classic 1950s American bike deserves white walls. 


I even included a little automotive touch - a traditional Chevrolet lapel pin on the saddle bag, which is a reference to the classic 1957 Chevy cars. The bag itself is the reliable, basic Banjo Brothers barrel type.


One item remains to be seen, which is whether I put the aftermarket rear rack back on the bike. This bike came with a Joannou-branded West German rack made from aluminum. It's a pretty nice rack. The issue is that the stock clamps that came with the rack were for the larger seat stays of an English three speed. These American three speeds have very thin seat stays with thick tube walls. The original owner made up for this with layers of electrical tape to pad the stay clamps used by the rack. Ideally I would find a smaller set of P-clamps to use with the rack. But then again I generally don't use a rear rack and it's more weight to power up the steep hills around here. We'll see if it stays off the bike...

So the good news is that the bike is basically done and ready for shakedown rides. The bad news is that the season is almost over, so any real riding with it probably won't happen until next spring. Maybe I'll get a shakedown ride or two in before things are done for the year. I'd really like to have this in a "ready to go" state when next season starts.


Friday, November 3, 2023

Thoughts for the End of the Bike Riding Season in New England

 With the arrival of November comes the usual end to the biking season here in western New England. I took my 1940 Raleigh Model 35 out for a ride last evening, which certainly was a chilly one. But with some additional layers, it wasn't a bad ride at all.

This season was a tough one in terms of weather. I lost probably 30% of my usual ride time to rain. There were also a couple nights lost to extreme wild fire smoke, but the big problem certainly was the rain. We had a cool, rainy summer to say the least. This held true into the early fall.

One saving grace was that we had a couple weeks of warm, dry weather in October, which helped redeem the season to some degree. I was able to ride right up through the first week of November. The turning back of the clocks that we have every year in early November usually puts an end to the season. I might be able to slip a ride in on a warm afternoon or two later this month, but we're basically done here for those after-work rides I take 3 times per week.

Road conditions were probably "average" this season. Car traffic was up somewhat, and some of the roads I ride continued to decline in condition. One local road was totally repaved, which improved things there a bit. But the main roads around here certainly need some repair. 

Pedestrian usage seemed about average. I saw a fair number of pedestrians and other bikes on the road. The number of group rides and organized training rides I encounter was down this summer compared to the last two summers. The rainy weather probably had a lot to do with that.

Overall, I would rate the riding season as below average in quality. The rain was a problem, and the main roads need repair. I always enjoy riding season, but some are better than others. This one wasn't the worst, but I'd rate it as slightly below average. It would have been worse, had we not had some better weather by the time October arrived.


Wednesday, November 1, 2023

A Facebook Market Find - 1991 Dutch Zwaluw Roadster

Here's something different - a Dutch roadster made by Woudt's shop under the Zwaluw brand. The model is a "Nevada" roadster. This bike has 28 inch wheels with Sturmey Archer drum brakes front and rear. The rear hub is also a 3-speed. These Steelite Sturmey hubs date to 1991.


A helpful user at BikeForums identified this as a Zwaluw bike made by Woudt in Koog aan de Zaan, Netherlands. 


 He also identified the electro-pen registration number as being a registration out of Wormerveer, Netherlands. 


This bike is newer than my others, but it was traditional in design, inexpensive and relatively local to me.


 It caught my attention because after some additional looking, it turned out to be a true Made-in-Holland roadster and not a reproduction or knock-off. 


It has the typical Dutch accessories: rack, lights, cargo straps, spoke guards, etc. It is a lugged, steel frame. 


The pump is missing, and it appears to have been a single-ended type pump (there's only one pump boss and no sign there was ever a second one). 


Overall, the condition is pretty good. I really like the subtle, blue-grey color.


So for projects, here is what remains:

  1. Finish up the 1957 Schwinn Traveler (almost done, just need to do shakedown ride/tweaking)
  2. 1951 New Hudson Silver Arrow (need to finish the wheels, clean, and assemble)
  3. 1991 Zwaluw Nevada (clean, and fully re-build)

At some point in the near future, my grandfather's 1936 Schwinn Henderson needs a clean and re-grease as well (periodic maintenance, but still needs doing).

 I also need to start the transition from my warm weather shop in the garage to my cold weather shop in the house. There's a fair bit of cleaning and organizing to do when that happens.