Thursday, August 24, 2023

Historical Piece: New Departure Ad - Utility Cycling in the U.S.

I came across another old ad I had not seen previously: a New Departure ad promoting their coaster brake in the context of commuter cycling. I've written several times before about attempts long before the 1970s "bike boom" to expand the use of bicycles by adults in the USA. These attempts included sport cycling, fitness, vacation touring, and work transit. 


Although Schwinn and Westfield/Columbia were chief among the American proponents for adult cycling, parts manufacturers also played a role. In this instance, we see an early 20th century ad from New Departure with a man riding to or from work on a suitably sized and equipped bicycle. 

The ad references bringing the bicycle "back", apparently from the crash years after the initial 1890s "bike boom". This ad appears to be from the 1910s or 20s. The ad reminds readers that a bicycle can be more economical than a car or taxi, and faster than walking. The ad very much envisions the British-style example of riding in normal clothes to and from work on a basic, diamond frame bike. 

This ad is just another reminder that although we sometimes think of American cycling for adults as going through "dark ages" between the 1890s and 1970s, there were certainly attempts to revive practical cycling, attempts which produced some interesting ads and text, and which also produced some wonderful bicycles such as the Schwinn New World, Westfield Sports Roadster, and even earlier bikes like the diamond frame antique shown in this ad. They were all just a bit ahead of their time...


Tuesday, August 22, 2023

1959 Schwinn Traveler - Shakedown Ride

I took the rebuilt 1959 Schwinn Traveler out for a "shakedown" ride of about an hour last night. This bike came to me as a simple frame, fork, and chain guard. However, I had many of the necessary parts for this bike already in my storage bins. 


I did have to buy a few parts - fenders, lights, handlebar stem, and the perishable rubber parts. However, I had the all the "big" stuff you need: wheels, brake system, bottom bracket, bars, etc. 


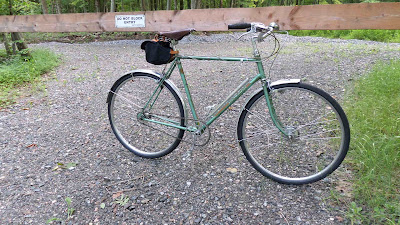
 The result is a nice, green Schwinn with classic 1950s elements - lots of chrome and stainless steel bright work. 


So what did the shakedown ride yield? Not a whole lot... which is a good thing. There was a somewhat loose seat post that turned just a little while riding. Fortunately, that was about it. The bike is a smooth, comfortable rider. It has the typical Schwinn heft to it, and the heavy frame and forged front fork dampen bumps from the road (our roads here have plenty of that).


Returning to that loose seat, the problem was at the seat tube clamp.  I replaced the post with a cr-mo chromed post. 


Every bike is its own project, with its own condition and circumstances. On a bright, outgoing bicycle like this, even the pulley wheel is highly polished. An older or more worn bike might have a more worn wheel I would select. But this one is nice and bright. Quick tip: on a Schwinn pulley, I like to use the keeper arm as a buffer for the brake cable housing. This prevents the housing from rubbing on the pulley wheel (which may prevent the wheel from turning properly).


 The brakes are the tried and true "Schwinn Approved" Weinmann models. They are aluminum and they work reasonably well for 1950s era sidepull calipers. The levers are Weinmann "red dot" levers. The red dot levers are light, though I find them not as precise as the English steel type levers.


The chain guard also has plenty of chrome plating, combined with matching green paint. The graphic is somewhat worn, but I am inclined to leave the graphics on this bike as part of its natural condition. I think replacing them with reproduction graphics might be "too clean" looking for the overall condition of this bike. They'd stand out as reproductions. The cranks are the typical, post-war Schwinn one-piece types. They're a big heavy, but the quality is pretty good.


The lights are my usual LED chromed front and aluminum bullet tail light. They look good on the bike, but also add an element of safety, being brighter than original lights.


 I use lapel pins on many of my bikes as a kind of "Easter egg". A WWII era bike might have a pin with a military theme. A more basic bike might get a pin with an old Ford, or Chevy, or Plymouth car logo. A higher end bike might get a luxury pin - something from a Lincoln or a Cadillac. I like adding something appropriate where, if you know your history or your bikes or your cars, you'll see that it's not random. Of course being a 1959, this bike got a Cadillac pin. If you've never seen a 1959 Cadillac, Google it... lots of chrome and fins. The bag is the Banjo Brothers Barrel Bag, which is a nice, compact bag that will hold your keys, wallet, and cell phone - good for an afternoon ride but still manageable.


This bike exhibits the classic Schwinn version of the three speed utility bike: laid back frame, heavy-duty construction, bright paint, and lots of chrome and stainless steel. I think it all works out pretty nicely. Chalk up another "save" bringing an old bike core back to life.


Thursday, August 17, 2023

"Found" Rides

 Tonight, I managed to get in what I like to think of as a "found" ride (a bit like what they call, "found" money). A "found" ride is a ride that you didn't think you would be able to take, one that was strongly in doubt due to time, daylight, weather, any other circumstance.


We've had an awful summer for rain. I don't think we've had more than two dry days in a row here in weeks. It seems like we get at least some rain every other day, or every third day. This time of year is usually pretty dry, but this summer has been cool and very wet.


Today started off very damp: foggy, with mist and light rain. I brought my riding clothes with me to the office in a bag, just in case I caught a good break. Given the weather this morning, I figured there was no way I'd be riding. But then I caught a break:  the weather cleared out just enough, and just in time, to squeeze in a ride of an hour or so this evening.

I had my bike (1949 Raleigh Clubman tourist) stashed in the office conference room from when I tried to ride earlier this week, but it rained at that time, so the bike stayed at work until I could get a decent evening. Tonight I managed to pick up a ride that I thought was lost to this awful weather... count it a "found" ride.


Any night you can ride is a good night, especially this summer...


P.S./Edit: Looking at that last photo, the plants are long, lush and very green for August around here. That's what they normally look like in May, but this summer has been so damp... the plants have been in fast-growth "May" mode all summer. My lawn mower has been at work all summer, it seems.

Tuesday, August 15, 2023

Progress - 1959 Schwinn Traveler Three Speed

 The 1959 Schwinn Traveler is proceeding. My last entry described some fine setting and straightening of the frame and fork. After I accomplished that and rebuilt the headset, I moved onto finding fenders for this bike.


Schwinn fenders differ from British three speed fenders in one important way: they are size-specific to different frames. Whereas the fenders for something like a Raleigh Sports can be transferred between bicycles fairly easily, Schwinn fenders were made with a specific frame size in mind. 

This is because rather than having a bridge clamp that goes over the fender at the rear brake caliper, Schwinn fenders instead have a riveted-on L-bracket. The position of that bracket differs on different frame sizes. Whereas on the Raleigh, you could simply loosen and slide the bridge clamp a little bit to make the difference.

Then there is the problem that Schwinn's fender braces vary slightly in length over the years they made the bikes. For example, the braces on a 1960s era Traveler will differ from the braces on a 1940s New World, even though they are both Schwinn three speed bikes. You need to make sure you have the right braces for both fenders to make the bike work. This is especially true on the front fender, where a brace that is too long or too short can ruin the fender position relative to the wheel. These are all subtle pitfalls that you'll encounter and did not necessarily expect. Fortunately, the parts are not overly difficult to find, for the most part, at least in the USA.


For this tall frame Traveler, I located a set of stainless steel fenders from a 1960 Traveler "standard" frame bike. The standard frame bike is just under 22 inches, whereas the tall frame I have is just under 24 inches. This means Given the year and frame sizes, these fenders will be close, but will need a little adapting to fit my project.

Above, you can see the fenders as they arrived. There was a great deal of work with the fender blocks to get those dents out. And then there was plenty of work with the drill press polishing wheel. I managed to get the dents out, and only a few small ripples remain where those big dents were. This work was accomplished using a mallet, ball peen hammer, and the homemade fender blocks (I used some pressure-treated scrap lumber for the blocks). Please pardon the finger prints all over the stainless fender...

When it came time to mount the rear fender, I had the problem of the frame size being different from the bike these fenders came from. The result is that the L-bracket was slightly too far forward to reach the brake bolt.


The solution was fairly simple - set the rear fender up the way a Raleigh might have it: with a bridge clip that allows me to custom-fit the fender to the bike. The old L-bracket was removed by drilling out the rivet. A stainless steel plug was made from a riv-screw by polishing down the head almost flush with the fender surface. Then the bridge clip was installed.Another option would be to mark a new hold and re-install the L-bracket at the correct point. This remains an option, but the bridge clip hides fairly well under the seat stays and allows me to custom set the fender position to match the wheel contour best.

Then there was the headbadge, which had been bashed at some point and needed some cosmetic work. I filled the gash in with JB Weld and smooth the work out. Then I touched up the areas of lost finish.

I also installed a set of handlebars and the stem, which as I found out from another collector, was a short-lived stem dating to 1959-60. You learn new things on each project.

The handlebars are still somewhat "up in the air". I have a set of Schwinn "North Road" style bars on there for now, but I may have a nicer set of Schwinn three speed bars from a slightly earlier bike that I may use. Either would work nicely and we'll see how it works out ergonomically for riding.

The result is progress through plenty of effort. Rebuilding a bike is a project, but it's basically 10,000 little jobs rolled in together. Solve each individual, smaller problem on the bike, and gradually the whole comes together. 


Sunday, August 13, 2023

Tool Tip - the Versatile Drill Press and Buffing Steel, Stainless, Aluminum, Etc.

Prologue: Get the Dents out First

I have written before about removing dents from steel and stainless steel bike fenders. 

The process is fairly simple. You make a fender block by tracing the profile of your fender onto the block. Sometimes fenders have different profiles at different places (e.g., the fender is deeper farther in, while has a flatter profile near the tail). 

After you have the block cutaways made, you take a round piece of wood matching what you cut away and put it inside the fender. You gradually work out the dents using the wood pieces and a hammer/mallet. 


I. Don't Overlook Your Drill Press!

Now, let's say you want to buff up those aluminum or stainless steel fenders. Sure, you could work them by hand over-and-over until they shine. But if you happen to have even a basic drill press, you already have a tool that can speed up the job considerably...

The drill press is a much more versatile tool than people often credit. Of course, with a carbide bit, they can be used to drill out metal pieces. But put a metal bristle brush tool in the chuck, and suddenly you have a powerful rust removal tool... Or, strap in a donor axle and you can refresh damaged hub cones for an old Schwinn... or English cones for an old Raleigh.

The drill press can also help you with your fenders. Look for a cloth wheel and mandrel kit in your local hardware store. They cost a few dollars and turn your drill press into a versatile buffer. It excels are larger jobs like aluminum or stainless steel fenders, but is gentler than the rapid-speed bench grinder with a buffer wheel on it. If you're careful, you can also buff chrome on a drill press wheel set to a medium or slow speed. 


II. Get Your Polishing Compound...

You don't need piles and piles of different polishing compounds to make this work well for you. My suggested list of compounds for a good, basic kit are:

  • Black polishing bar (Emery) - a relatively aggressive, coarse compound for deep scratches on stainless steel or bare steel. You won't need this one a lot, but it's nice to have if you get a rough project.
  • White polishing bar (called "Diamond" or "White Rouge") - a medium-fine compound good for starting the high-luster buff on aluminum or stainless steel.
  • Red polishing bar (Rouge) - a good, fine compound for final or semi-final finishing.
  • Simichrome polish - a high-quality polish that excels with stainless steel, aluminum, and chrome. (it's really versatile stuff ). Good finisher after a pass with rouge bar.
  • A good paint-friendly polish like Maguire's or NuFinish. Gentler than Simichrome good for that light clean-up on painted surfaces or high-shine surface.


You will see other compounds (e.g., Brown "Tripoli" or Green "General") - I don't think you necessarily need them. In fact, you'll rarely use the black emery compound and will probably use a lot of the red rouge and the Simichrome. Only some projects have those deep scratches on bare metal suited to something coarser than the white compound. But many projects need that nice, final shine you get from red rouge or Simichrome, for example.


III. Getting Used to the Drill Press Buffer

Set the drill press to medium or slow speed. Put a little of the compound you need on the cloth wheel and begin working the fender gently and evenly from one end, taking care not to bear down on or round-off corners and edges. When the wheel begins to run dry a bit, refresh the compound on the wheel. Work each area once, don't buff the same area over and over. Don't bear down hard or heat the fender up too much. You'll get the hang of it fairly quickly.

Start coarse and go finer. Don't feel the need to always start with emery bar - it's perfectly fine to start fine and go finer. In fact, my most-used compounds are red rouge and Simichrome. I need white bar once in awhile, and black emery only for bare stainless or steel that is really scratched-up. I go through three bars of red for every one white, and five bars of red for each black. I follow the red with Simichrome on stainless, aluminum, bare steel, or chrome.


Painted fenders are tricky. Hitting one spot hard or heating the fender up will damage paint. With painted fenders, my first choice is to work by hand with a good car polish like Maguire's or NuFinish. But for some tough cases where the paint is something durable (e.g., Raleigh black), and where something tougher is needed, I use the drill press buffer. In those cases, I set the machine speed to slow and work very gently using my softest cloth wheel and only car polish. This requires care and attention, but can produce a good result in not much time.


IV. So in Summary, Don't Go Straight to the Bench Grinder...

People often think buffing wheels are the domain of a bench grinder. Some of the better grinders can do a good job, but I much prefer the slower drill press running an open, cloth buffing wheel. The drill press wheel does not have the guards that get in the way of manipulating the piece you are polishing, and something like a 5-speed drill press gives you good choices in how fast you want to spin the buffer. Most of the speeds are slower than the bench grinder and give you a versatile polishing tool (not to mention a cone-smoothing tool, hole-maker, rust-removing brush, etc.).


Wednesday, August 9, 2023

1959 Schwinn Traveler "Tall" Frame Three Speed

 My latest addition is yet another project bike - an attractive, green 1959 Schwinn Traveler three speed bike core.


This 1959 Schwinn Traveler is unusual in that it is a "tall" frame model: a 23-24 inch frame that rides on 26 inch wheels. Most Schwinn "tall" frame three speeds date to the late 1960s through late 1970s. Although the later bikes are solid choices for a utility rider, I am particularly drawn to these earlier, more ornate models. 

I've gradually devolved over the years from looking solely for complete, largely original and nice condition bikes to finding and fixing up decent bike "cores". I'm at the point that I most enjoy taking something like this and bringing it back to life where it can ride again. Many parts added will be correct to 1959, while others will be period correct for the 1950s era. I'll go with a new Brooks B66 saddle and retro LED lights (a torpedo tail light rear and chrome bullet front).
 

 These late '50s and early '60s Schwinns have very ornate graphics on the frames featuring tri-color bands, ribbons, hat-in-the-ring, and Schwinn logos. The graphics on this particular bike are in so-so shape. They're mostly there, but certainly have some loss here and there. I'm inclined to keep them as they are rather than try to strip them and replacement with reproductions. I think the wear matches the condition of the rest of the bike just fine.


 Schwinn had some nice, luxury type touches on these bikes. It has a nice, chrome seat clamp with monogram "AS" bolts - Arnold, Schwinn & Company. My 1964 Traveler has the same kind of thing.


The color also drew me to this model. It is a two-stage green translucent over an aluminum base coat. I've found Testors paints that will match this combination pretty nicely.


I've already done quite a bit of work. The fork needed some straightening, which I accomplished using a block of wood and the Park Tool HTS-1. I followed that with final tweaking on the Park fork straightening jig that mounts in a vise. I also ran the HTS-1 through the head tube to verify the frame angles are OK. The HTS-1 generally works for slight corrections, and this bike core is pretty good. So far... so good. The HTS-1 tool, for all the talk surrounding it online, is not a miracle-worker and don't expect it to save bikes that are severely bent.

The fork needed some additional work to re-set and tighten the crown race. One secret to tightening a persistently loose crown race on a basic bike like this is that you can use a ring of thin, sheet brass to "take up the slack". Cut a thin strip of brass and wrap it once (no overlap) around the steerer tube where the crown race will go. Next, drive the crown race carefully down over the sheet brass ring. Because the brass is softer, it will conform and to the tiny gap between the steerer tube surface and the crown race. 

I like to use a closely-matching piece of pipe to drive the entire crown race at once. However, you can also drive the race by carefully and evenly hitting it with a punch, working around the edge as you go to keep it even. Be careful not to mar the bearing race in the crown. You'll be left with a tight crown race when you're done. In a pinch, a ring of soda can aluminum can also work, though the sheet brass is a bit more workable and uniform.

I've also already done quite a bit of repair to the paint. The Testors paints I'm using are relatively user-friendly and match reasonably well.


 As you can see from the sale photo above, there's a gash in the original head badge, a winged badge I rather like. So this received a little JB Weld to even the surface and some matching paint to hide the damage. 

There's no secret to doing this kind of work well. Just go slow and pay attention to little details. JB Weld is affordable, workable, and sets slowly enough that you can correct your mistakes. It's also sandable and paintable when you need to do final work.


I'll cover my extensive work on the stainless steel Traveler fenders (parts pulled from a junked bike) in the next entry. It will involve fender straightening blocks and a lot of polishing...


I think once it is done, this bike will make a nice pair with my 1964 tall frame Traveler. The '64 is in better condition, and comes in a very sleek, black paint with chrome and stainless bright parts. 


Tuesday, August 1, 2023

1949 Raleigh Clubman - Tourist Variation


 I picked up this 1949 Raleigh Clubman from a fellow collector in Massachusetts a few weeks ago. The bike had already been gone over (15 - 20 years ago maybe?) but needed a refresh. So refresh it I did.

  • Clean and re-pack or re-oil all bearings.
  • Clean all chrome from any rust (there wasn't much).
  • Clean and re-pin cranks.
  • Disassemble and rebuild both hubs (rear needed a new axle and mounting nuts)
  • Disassemble and rebuild shifter.
  • Clean and reorganize electrical wiring.
  • Clean and lubricate brake cables.
  • Bandage brake cable housings with clear heat shrink as needed.
  • Measure and make new shifter cable (brass tube and Bell Systems crimper method)
  • Match and touch-up paint in some places.
  • Clean, straighten, and re-build aluminum fenders.
  • Add rear fender heron transfer.
  • Add Brooks B67 saddle and Acorn canvas bag.
  • New rim strips and tires.
  • New brake pads.
  • True wheels and tension spokes.
  • Add Nitto swept back handlebars
  • Add Gary Burgess alloy girder stem.
  • Add MKS Sylvan touring pedals
  • Repair cosmetic damage below bottom bracket from an over-tightened kickstand. 
  • Repair hole in front fender from a headlight someone added - rivet nut and leather washer as a "hood ornament". 
  • Add 22-tooth cog in back. Add new SRAM PC-1 chain.


 Almost all of these tasks I've discussed before on this blog, so I see no reason to re-show them. None of this is particularly exciting work, but taken together, it helps revive this bike.


I chose the tourist/utility configuration because I find it so comfortable. I prefer it over drop bars. This bike did not have its original handlebars anyway, so why not run a nice set of Nitto swept back bars, which are very close the 22 inch Raleigh "larger" North Roads? 


I'll leave a few notes on the project below, even if it's just so I can look them up again in case I have to work on it in the future.

  • The original pedals are great - totally rebuildable and original to the bike. Unfortunately, they have tall end spikes that make them somewhat uncomfortable with a regular pair of sneakers. The pedals are still good, but the Sylvan works better if you're riding with regular sneakers.
  • The original saddle is even still good (a narrow Brooks road type). I just find the B66/67 series more comfortable.
  • The Nitto swept back bars are great for a bike like this. They're very, very close in dimensions to the old Raleigh 22 inch "larger" North Roads (note - Raleigh made both a smaller 20 inch and larger 22 inch North Road bar. They look very similar but have differing feels.)
  • The paint can be matched on this bike using a mixture of Testor's Flat Beret Green and Testor's Flat Aluminum. The blend is roughly 50/50 for most of this bike, but varies a drop or two in each direction depending on the fading in different areas. But when you match it, it matches pretty nicely. Flecks of flat black can be added if needed to give a "weathered" look. 
  • The original paint is pretty fragile, as most of these old aluminum blend paints were.
  • The bike came with a set of Schwalbe 26 x 1 1/4 club tires. I wish they still made these tires - they're very sporty compared to the Kenda. Unfortunately, the rubber around the wires on this set had deteriorated to the point they would not mount straight any longer.
  • The original wing nuts and axle on the rear hub were marginal, and decided to give way on my test ride. Unfortunately, they waited to slip until I was in the next town over. Hence the replacement with a regular set of nuts and a new axle. The Mrs. had to come get me on that ride...
  • Testor's Flat Aluminum matches the stock silver paint on the head lamp pretty well.
  • I need to determine whether I want to run with a mud flap or not. Originally the bike would have had a front mudflap. I left the rivet-bolts longer there to mount a mudflap if I decide I want one later.
  • The aluminum Dunlop Westrick rims are killer - very light and lively riding. They brake well too.
  • The cosmetic damage underneath, near the bottom bracket is repaired using shaped JB Weld, then sanded and painted to match. 
  • (Note to self: The old style GH6 Dynohub on this bike goes on the LEFT side. A subsequent change moved them to the right side.)
  • Gear ratio is a forgiving 46 front, 22 rear.
  • The rear reflector has a neat "RI" inset into it. I didn't notice this at first.