Tuesday, April 23, 2024

1951 New Hudson Silver Arrow

Here are a few shots of a recent project - a 1951 New Hudson Silver Arrow. This bike came in last year having been gone over and ridden by another collector recently. Much of the dirty work had already been done. This was from the era where New Hudson was a BSA brand.

This bike came as a drop bar single speed with a flip-flop freewheel and fixed gear hub. I built up a second set of wheels for it: a three speed wheel set using Dunlop club style rims (26 x 1-1/4 597mm). I swapped the drop bars to north road bars and replaced the road saddle with a Brooks 66. The brake levers are from a 1950s era Phillips.


 The original celluloid fenders were broken in shipping, so I replaced with a comparable set of Bluemels white plastic fenders. I added a New Hudson decal from H.Lloyd decals in England.


The result is a sporty light roadster: laid back frame angles, Reynolds 531 main tubes, and an upright ride. This is the third of three bikes following that concept. I now have a 1953 Raleigh Lenton, 1949 Raleigh Clubman, and 1951 New Hudson Silver Arrow, all set up with upright bars and outfitted similar to utility bikes.


I still have a few loose ends to tie up: clean up the paint a bit, final truing of the wheels, and fine tuning of the brakes and headset. I also am considering a newer Brooks 67 saddle with an aged brown finish, but that remains an open question. 

I like how the laid back frame angles combine with the lightened frame and sporty components.


New Hudson Silver Arrow (tourist configuration specs):

  • 23 inch, laid back frame, Reynolds 531 main tubes
  • 26 x 1-1/4 Dunlop rims, 40 holes front and 32 rear
  • Sturmey Archer AW alloy shell rear hub, Raleigh branded steel front hub
  • Sapim stainless steel spokes
  • Steel quill stem and north road bars
  • 1950s Phillips pattern brake levers
  • Brooks 66 saddle (at least for now)
  • Bluemels fenders with H.Lloyd New Hudson decal
  • New Hudson brakes with new pads (they use John Bull pattern pads in unusual pad holders)
  • Kiley front LED retro headlight
  • Generic LED small tail light (uses two flat watch type batteries)
  • MKS Sylvan pedals (9/16 axle)
  • Banjo Brothers barrel canvas saddle bag
  • Kenda 597mm tires


Monday, April 15, 2024

A Three Speed Bike Parts Finds So Far This Spring


I've had pretty good luck so far this spring locating the kinds of parts one usually needs to rebuild a derelict, old three speed.


Some parts, such as 1930s-50s Schwinn parts, or pre-war Raleigh parts, are harder to find. So I was happy to locate some good parts at reasonable prices this spring. 


These include a pre-war Raleigh fender reflector, a set of very nice "Schwinn Built" brake calipers from a late 1940s Schwinn three speed, Scwhinn frame cable clamps from the same 1940s era bike, and a bundle of very nice Sturmey Archer quadrant shifters from the 1930s-40s.


Now... if only the weather will cooperate with ride season. We shall see...


Wednesday, April 10, 2024

Handlebar Swap for 1959 Schwinn Traveler


When I first rebuilt and tested this 1959 Schwinn (it arrived here as a bike core and I built it up), I used a set of Schwinn New World tourist style bars from the late 1940s or early 1950s. I recently acquired a couple nice sets of Schwinn "north road style" bars, which are more appropriate for a 1950s or early 60s era Traveler. One of these sets came off a scrapped 1962 Traveler, a closer match for this 1959 bike.

Handlebars for Schwinn three speeds are trickier to get right than those for a Raleigh. The reason is that Raleigh handlebar stems generally have more range of adjustment than the smaller, forged stems used on many American bikes of the period. The American stems tend to be rather short. The result is that your handlebar drop and reach becomes a primary means of setting up the bike to fit on the Schwinn. 


In this case, the north road-style Schwinn bars work nicely. The short-lived 1959-60 forged stem is kind of short, but Schwinn's north road bars from this period have a little more rise and pull back compared to Raleigh bars, so it works out to a good fit.


Monday, April 8, 2024

Solar Eclipse - April 8, 2024

 Couple nice shots of the solar eclipse from earlier this afternoon that I took.


Sunday, April 7, 2024

Wheelbuilding Notebook: Sun CR-18 Rims (26 inch, 590mm) for Schwinn Three Speeds

 Several times in the past, I've written about using Sun CR-18 rims to spice up vintage Schwinn three speed bikes. Vintage Schwinn bikes usually use 597mm rims (S5, S6 sizes), a different size from the normal 590mm  (26 x 1-3/8) rims used by English bikes.

However, many Schwinn three speeds have calipers that will reach far enough to use the slightly smaller and more common 590mm 26 x 1-3/8 rims. 

For example, I used CR-18s previously on a pre-war Schwinn New World. See HERE.


And I built a bike for my wife using Sun CR-18 rims and a 1946-47 Schwinn New World. See HERE.

In the case of the pre-war New World, the "Schwinn Built" steel calipers were able to reach the slightly smaller Sun rims. In the case of the post-war New World, a set of Weinmann 810 "Schwinn Approved" calipers also were able to reach.

So what size spokes should you use? Here is what I use:

  • Front wheel: Schwinn or Schwinn "Approved" hourglass hub (sometimes called the "Schwinn script hub"). 36 holes, cross 4 pattern. Rim is Sun CR-18, 36 hole, 26 x 1-3/8 (590mm). Spoke length is 288mm. 


  • Rear wheel: Sturmey Archer AW three speed rear hub. 36 holes, cross 4 pattern. Rim is Sun CR-18, 36 hole, 26 x 1-3/8 (590mm). Spoke length is 286mm. 


Below are my results using a spoke calculator. These spoke lengths filled the spoke nipples to their ends without going over.


Wednesday, April 3, 2024

Vintage Three Speed Bike Value Update - Copake Auction March 2024

I periodically do status checks on the values of three speed bikes in the market. For many years, the more common models have tended to be somewhat undervalued when you consider the quality, durability, and practicality of these bikes. 

There was a Copake bicycle auction just a few days ago featuring a number of three speed bikes, so let's take a look at the values rolling in... (these prices do not include buyer's premium, which should not be all that large considering these bikes are pretty affordable)

Lot 86 is an early Raleigh Sports model for the US market. This is a pre-WWII bike (I would guess 1938 or earlier based on the frame angles) with the old-style laid back frame angles. Final price of $120. It looks like it may have had some parts changes over the years, but a pretty good bargain if you like early Raleighs for the US market.


Lot 87 was a coffee Sports, men's tall frame model. Final price of $108. That's pretty good for a largely complete Sports in a desirable size. 


Lot 88 is a Japanese-made Royce Union three speed. It's a knock-off of a Raleigh. Closing price of $108. The tall frame coffee Raleigh was the better deal at that same price. I would pass on the Royce Union at that price - just too much for a knock-off bike in a smaller frame size. Perhaps these are becoming more valuable(?). I am surprised it was anywhere close to what a tall frame Raleigh Sports would bring.


Lot 89 is an unusual Raleigh-made Dunelt rod brake roadster. This is an unusual model for the US market. Most rod brake models in the US from the 1960s and 70s were Raleigh-branded and followed the "DL-1" style pattern. This Dunelt is a desirable medium frame model, with unusual chrome fenders. Final price of $120 is a good buy for an unusual and very ride-worthy roadster.


Lot 90 is another interesting bike - an old style Raleigh that is a mixture of Sports and road/club elements. The fluted cranks give away that this is something a little better than usual. It comes with a dynohub system and the condition is pretty good overall. It has neat, white-painted fenders. The only downside is it's a small frame rather than the men's tall frame type. But if this bike fits you, $180 is a good buy for a sporty, old school Raleigh.


Lot 92 is a nice, tall frame men's Humber Sports. There's nothing rare or unusual about this bike. It's a Humber from after the duplex fork era. It's in good shape though. The color looks nice as well. It needs some work, but for $96, it's a good deal for a very practical bike in a desirable frame size.


Lot 93 is a much earlier Humber. It has the desirable duplex fork and is pretty complete. The condition looks good. The grips are worth a close look - they look like original 1950s era grips (highly desirable - hard to find these in good shape). The only downside is it's a women's frame. I hope some lady bought it, fixes it up, and rides it. It would be a shame to see it parted out, which is the fate of so many of these ladies' bikes. It's a rod brake model to boot. At $60, this was a bargain.


Lot 186 is a Swiss Army Bike. The market for these bikes seems to be all over the place. It ranges from, say $100, and goes way up. I've seen very clean and original examples with lots of equipment sell for over $1,000. This bike sold at $150, which is very reasonable and a pretty good deal. The only downside is it's a smaller frame size.


My take-aways:

  • The market for basic three speed English, American, and similar utility bikes is still on the cheap side. There has been no drastic change to the fact that these are still affordable bikes. 
  • The Copake Auction still provides some good bargains. There is also the pre-auction swap meet that could provide a bargain buy. Some bikes go for more than they should, but it's worth looking at these auctions and swaps because there is good stuff at good prices to be had if you keep your eyes open.
  • Most of the bikes are still more valuable as parts than whole bikes.
  • Surprisingly, the somewhat earlier and more collectible bikes did not do drastically better than the later and more common ones. The difference was maybe $75-80 or so. That's not a lot in today's rather de-valued currency. 
  • I'm not sure what the deal with the Royce Union selling for as much as the tall frame Raleigh. It's Japanese-made and was always a "garage sale" type bike. Maybe there is a market I've overlooked for these older Japanese-made utility bikes. Japanese 10 and 12 speed road bikes have undergone a kind of renaissance over the years where people actually look for them and pay decent money for the better ones. Maybe the market is starting to appreciate these unusual Japanese three speeds more now as well. But this is just one example... we'll see what happens.


Tuesday, April 2, 2024

1957 Schwinn Shakedown Ride, Kool Stop Weinmann Style Inserts

I finally did a proper shakedown ride on the 1957 Schwinn Traveler bike. This is an unusual tall frame bike from an era when Schwinn was not building many full-sized bikes of this sort. Adult cyclists in the United States were a rare thing in the late 1950s, as the late Sheldon Brown once noted. 


I was generally happy with the way the bike rode. The stem and swept-back Schwinn handlebars are comfortable and all the mechanical aspects ran smoothly. The bike fits an adult rider nicely, being a 23-24 inch frame. The understated graphics for that time have a surprisingly modern look. They would not look out of place on even a 1990s era bike.

I was unhappy with the persistent "buzzing" of the Kool Stop Weinmann insert brake pads.  These pads are advertised as direct replacements for 1950s-60s era Weinmann pad holders, and they fit the holders reasonably well. Despite several tries and brake adjustments, they still buzzed badly. I could see the beam gyrating on the ground when I would apply the brake.

The Kool Stop insert pads are an interesting concept for re-using old pad holders, but I had to swap them out after my ride. I have a set of similar Bell brand pads I will try next. A quick test indicated they vibrate less.


Tuesday, March 26, 2024

A Schwinn Traveler That Wasn't - Evolution Before Mass Production

In the early 1950s, the three speed and similar Schwinn lightweight/utility bikes had reached a cross roads. Schwinn's push in the late 1930s and into the 1940s to market British-style, Made-in-USA touring and utility bikes with to adults in the US had hit the market wall that was the late 1940s and early 1950s automotive boom.

It was in this environment in the early 1950s that Schwinn revised its era three speed and utility bike offerings as well as the way it marketed those bikes. The  New World and unusual post-war Superior (not to be confused with the upscale "Superior" made before WWII) were replaced. The upscale fillet brazed Continental was scaled back compared to its late 1940s version.

One of the bikes that stepped into this mid- and up-scale market void for Schwinn was the "Traveler" or "World Traveler" (not to be confused with much later World Traveler bikes made in Japan). 

But the early ads for the Traveler are not quite the bike we know today. These early Travelers mixed elements of the earlier Continental with what we know today as Traveler type parts.


Above we see what the Traveler might have started as, but ultimately what was never to be: a mixture of Continental and Traveler bike elements. The bike has the low-profile fenders styled after the Continental, as well as the three-arm chain ring of the Continental. But it also has the one-piece crank we associate with the Traveler. The bike also has the Sturmey Archer quadrant shifter we associate with 1940s Continental models, but the English-style accessories we associate with the Traveler. The head badge is round, similar to the Continental.

A second early ad shows the same bike - well, almost the same bike. The quadrant shifter is gone and now there is a handlebar shifter. Also note how the fenders are Continental in style but allegedly made of chrome rather than stainless steel, like the early production Travelers.

These ads also show a shift from the more adult ads of the late 1940s, which showed stars such as Ronald Reagan and Humphrey Bogart on Continental models. These 1950s ads are more youth-oriented, even though the bikes still were diamond or step-over framed and could be ridden by adults. Schwinn sensed the way the market was headed in the 1950s. 

In the end, this hybrid of the Continental and the Traveler was not to be. The Traveler underwent some changes and the production model we know today was different. The standard Schwinn "clover" chain ring was used, as were "shark blade" fenders similar to other Schwinn bikes. The first few years of Travelers had chrome fenders, while later in the 1950s they changed to stainless steel.

The ad above has a student-oriented motif and shows the production Traveler we are familiar with today. This includes the clover chain ring, finned front fender and handlebar shifter.

As with so many other bikes, the Traveler evolved between its initial design on paper to its mass production form in the early 1950s.


Thursday, March 14, 2024

Bike Service Records - Charts

If you have more than a couple old bicycles, perhaps you could benefit from a service history chart. A detailed chart can keep track of when each major system was serviced on the bike. Here is an example of the chart I use, which is meant specifically for old-style bikes with internal gear hubs.

I use Microsoft Excel or Apache Open Office to build my charts. They both are equally effective for this task. Open Office has the advantage of being relatively simple, and free to download.

Different types of bikes have different charts. But the gist is the same: mark down the date each of the major systems on the bike was last serviced. 

As a bonus, a notes column can help you keep track of parts swaps you've done in the past or estimated mileages at different times; another column can remind you whether you want to keep or sell a bike (or buy it, if you are borrowing or renting the bike).

 Other columns can keep track of tire sizes needed, as well as frame and wheel sizes on a particular bike.


Thursday, March 7, 2024

1946 Schwinn Continental

 Here is a a recent re-build: a classic 1946 Schwinn Continental three speed. 


This project started as a incomplete bike that was still in nice condition. I worked off-and-on for about two months on the tear down and rebuild. I tend to work slowly in the winter, only spending a couple hours per week.

Before:


 After:


This style of Continental is not to be confused with the later, 10-speed Continentals of the 1960s and 70s. These early 1940s-50s Continentals were hand-built (fillet brazed) from cro-moly steel. The bike is lighter than a typical, welded steel Schwinn frame, but overall the weight savings is not huge. The biggest rider-changer is the lighter, S6 stainless rims versus the usual welded chrome S6.


 We're still at the tail end of winter here, which means the bike is stowed away until riding season finally arrives. I have to do some final tweaking to brake pad positions, handle bar position, and seat position. These are items for a "shakedown" ride.


1946 Schwinn Continental

Specs:

  • Frame: 22 inches bottom bracket to seat tube top. 
  • Tubing: Cro-mo fillet brazed. 
  • Fenders: Schwinn stainless steel. Front is low-profile pattern.
  • Rims: 26 inch S6 (597mm) endrick. Schwinn S6 stainless rims (36 hole).
  • Hubs: undated Sturmey Archer AW three speed rear, Schwinn aluminum alloy front.
  • Shifter: 1940s Sturmey Archer quadrant.
  • Spokes: Torrington Co. galvanized double-butted. 
  • Gearing: stock 46-tooth Schwinn front, 22-tooth Vuelta cog rear.
  • Pedals: MKS 3000S 1/2 inch spindle.
  • Brakes: Schwinn steel calipers and brake levers.
  • Saddle: Gyes three-spring leather tourist.
  • Bag: Acorn canvas "small" saddlebag.
  • Lights: Kiley front, Soma bullet rear. Both LED.
  • Stem and bars: Tall Schwinn razorback stem, Schwinn tourist steel bars.

Tuesday, February 27, 2024

A Note on Grease and Vintage Sturmey Archer Hubs

Quite awhile back I discussed my recommendations for oiling vintage Sturmey Archer hubs. These are the old style hubs with oil caps, which allow the user to periodically put oil in the hub. 


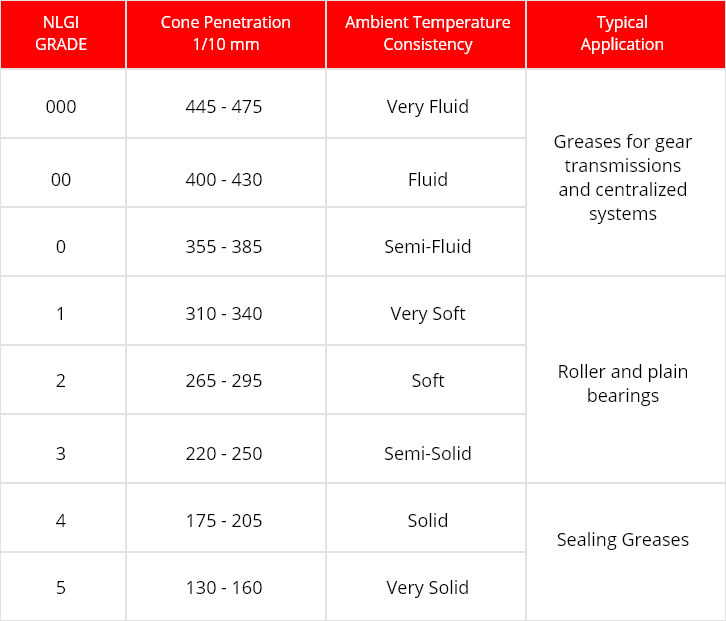
Modern Sturmey Archer hubs, some of which are mechanically similar to old hubs, use a semi-fluid (called NLGI #00 grade) grease rather than light oil for lubrication.  


In fact, semi-fluid NLGI #00 grease can be used in vintage Sturmey Archer hubs as well. The trade-off is that in order to properly grease the hub, you need to open up the hub, break it down, clean it, and then re-assemble using the right amount of grease. The hardcore internal gear hub fanatics would have no problem doing that.

The advantages of a total tear down and full grease treatment are that service intervals are stretched out, the grease tends to stay in place better once you've put it in the hub, and routine oiling is basically eliminated.  The disadvantages are the work of tearing down, cleaning, and re-greasing the hub and semi-fluid grease is not always available from the local hardware store (my local shop had some at one time, but then stopped carrying it).

 The commonly available "green" grease I use (Lucas or Blaster brand usually) is a medium-grade grease (NLGI #2). It is too thick to use throughout a vintage Sturmey hub, such as an AW or FW. I am using this grease on the outer bearings in the main cups, and a modest amount of it in the ball ring bearings inside the ball ring. These areas of the hub respond and seal up reasonably well with the common green grease.

For the core of the hub, I use 20 weight oil. My oil of choice is, as I've said many times before, 3-in-1 "blue" bottle oil, that is, the little bottle with the word "motor" or the little drawing of a motor on it. 

 I like this combination because your oil and grease can usually be bought from the local hardware store, the grease seals in the light oil reasonably well, and the oil is thin enough penetrate into the small spaces in the center of the hub. Routine oiling frequency is reduced but not eliminated entirely. I like this combination of factors, and I think the average mechanic and user of these hubs benefits from the convenience. 

But please don't assume this is the only way to lubricate the hub. I know of advanced mechanics who prefer a full semi-fluid grease treatment and do well with it. There is more than one "right" answer to lubricating your hub. I just happen to like the ease and versatility of common green grease in the bearings and 20-weight oil in the hub core.

Sunday, February 25, 2024

Advanced Sturmey Repair: Replacing Left Hand Ball Cups on Old AW and FW Hubs


This entry discusses a somewhat more advanced repair to older Sturmey Archer hubs: removal and replacement of the left (non-drive) side ratchet ring. This part is called the "left hand side ball cup" in the old diagrams (see above - part K517).  

Why would you want to do this? It allows you to save an older hub that has left (non-drive) side cup issues, replacing the ratchet ring and bearing cup as a unit. This work applies to older Sturmey Archer AW and FW hubs that have flatted ratchets. This is a good fix if you have a pre-war AW hub that needs a refresh, for example. In the early 1960s, the hubs switched to a press-in left hand ball cup. This article refers to the earlier hubs with threaded and flatted left hand ball cups.

There are two ways to replace the non-drive side ratchet ring and bearing cup. The first is if the hub is laced into a wheel, you can use the wheel and a heavy-duty vise to spin off the ratchet ring and cup from the hub shell. The second method is if the hub is not laced into a wheel, you can use the Gentleman Cyclist ball ring tool, heavy duty-vise, and a 15-inch adjustable wrench to spin off the non-drive ratchet ring and cup.

CAUTION: This a job for the "advanced" Sturmey Archer enthusiast because it requires some heavy-duty tools and an understanding of how the older AW or FW hub works.


You'll Need:

  • Heavy-duty bench with a bolt-down vise.
  • Propane Torch
  • Loosening oil (I like Kano Kroil)
  • 15-inch adjustable wrench (if hub is not laced into a wheel)
  • Gentleman Cyclist ball ring tool (if hub is not laced into a wheel)

If the Hub is Laced into a Wheel:

  • Using the Sturmey Archer hub instructions, remove the innards of the hub so that you are down to just the hub shell and the non-drive ratchet ring/cup (called the "left hand ball cup", part no. K517 in the diagram below). Fix the hub into the vise by tightening the jaws around the flats of the left hand ball cup.


  •  Dribble some of your creeping oil inside the hub shell, focusing on the area where the left hand ball cup threads into the inner surface of the shell.
  • Gradually and evenly heat the outside of the hub shell in the area where the left hand ball cup threads in. Warm that area until you start to see little bubbles in your oil inside the hub. Caution - do not overheat the oil, hub, or spokes.
  • Let it cool. Repeat the cycle of oil, heat, and cool once or twice more.
  • Using the wheel as leverage, spin the wheel clockwise (the left hand ball cup is left-hand threaded). If the left hand ball cup will not spin off, repeat the heat/oil/cool cycle again.
  • Once the left hand ball cup is loosened, spin the wheel so that it frees from the left hand ball cup. Replace the left hand ball cup with a good cup by mounting the good cup into the vise and spinning the wheel counter clockwise until tight.


What if the Hub is Not Mounted into a Wheel?

If the hub is not mounted into a wheel, you'll also need the Gentleman Cyclist ball ring tool and a heavy-duty wrench. I like to use a 15-inch adjustable wrench.

  • Remove the hub innards from the hub. Place the Gentleman Cyclist Ball Ring Tool into the vise as you would to mount a ball ring. 
  • Put the hub shell into the vise, tightening the jaws around the flats on the left side ball cup (K517 in the diagrams above).
  • Dribble your oil into the inside of the shell, focusing the oil on the threads where the left side ball cup joins the inside of the hub shell.
  • Heat the outside of the hub shell using a propane torch evenly and gently around where the left hand ball cup threads in. Keep heating until you see little bubbles in the oil inside the hub. Let cool. Do not allow the oil to burn or smoke off.
  • Repeat the oil/heat/cool cycle once or twice more.
  • When sufficiently cool to handle (caution - hub may still be somewhat hot) mount a drive-side (right side) ball ring into the hub shell using the tool. [I assume that if you have this tool, you know how to use it to put in a drive side ball ring already.] This is part K60 in the diagrams above.
  •  Now you should have a hub shell with a left hand ball cup on one side and a right hand ball cup on the other, but without anything else in it. The hub should be resting upside down - with the drive side ball ring in the Gentleman Cyclist Tool. The non-drive side ball ring flats should be facing upward.
  • Attach your large adjustable wrench to the flats on the non-drive side cup which is facing upward. Make sure the notches of the drive side ball ring, which is facing downward, are firmly in the Gentleman Cyclist Tool.
  • Begin to turn the wrench clockwise (the non-drive side ball ring is left hand threaded). Apply gradually more and more force until the ring gives and begins to spin off. 
  • If the ring won't move even with great force, repeat the oil/heat/cool cycle for those inside threads as stated above.
  • Once loose, spin off the non-drive side cup and replace with a good cup. It will thread in counter-clockwise because it is left hand threaded.

Photos:

 Below: an illustration of the oiling the hub. This hub shell is not in a wheel, and the innards have been removed. At this point all I have is the hub shell, the left side ball cup, and the right side ball cup in place. I have dribbled oil down the inside wall of the hub and into the joint between the left hand ball cup and the hub threads.


Below: here is the outside of what I have: hub shell with both the left ball cup and right ball cup mounted. The flats of the left side ball cup are gripped in the vise jaws.
 

 I then apply the torch evenly around the base of the shell, where the oil is sitting in the left ball cup threads. I heat until the oil bubbles, but stop before it burns or smokes out. I then let it cool, and that helps draw the oil down deeper into the threads.


Once sufficiently cool, the Gentleman Cyclist tool is mounted into the vise, and the hub shell is flipped over so that the right hand ball cup/ring connects firmly to the Gentleman Cyclist tool.


A large adjustable wrench is then applied to the flats on the left hand ball cup. It's left-hand threaded, meaning I turn the wrench clockwise to loosen.

Below - the left hand ball cup finally loosens up after several heat, cool cycles with the oil. I can now turn the left hand ball cup off and replace it.


Below- after removal of the left hand ball cup, you can see the shiny areas of thread where the oil penetrated. Lots of oil in those threads is a good thing. You get the most out of your effort when the oil fully works its way down.


Below are a couple of Sturmey hubs saved in just one weekend. One is a pre-war AW with 40 holes and the other a 1950 AW with 40 holes, both great hubs for vintage English bikes.