Tuesday, February 27, 2024

A Note on Grease and Vintage Sturmey Archer Hubs

Quite awhile back I discussed my recommendations for oiling vintage Sturmey Archer hubs. These are the old style hubs with oil caps, which allow the user to periodically put oil in the hub. 


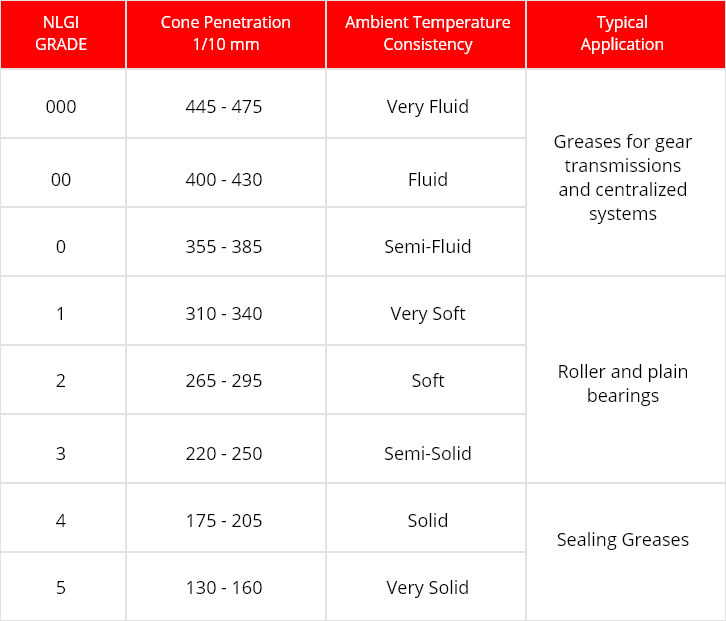
Modern Sturmey Archer hubs, some of which are mechanically similar to old hubs, use a semi-fluid (called NLGI #00 grade) grease rather than light oil for lubrication.  


In fact, semi-fluid NLGI #00 grease can be used in vintage Sturmey Archer hubs as well. The trade-off is that in order to properly grease the hub, you need to open up the hub, break it down, clean it, and then re-assemble using the right amount of grease. The hardcore internal gear hub fanatics would have no problem doing that.

The advantages of a total tear down and full grease treatment are that service intervals are stretched out, the grease tends to stay in place better once you've put it in the hub, and routine oiling is basically eliminated.  The disadvantages are the work of tearing down, cleaning, and re-greasing the hub and semi-fluid grease is not always available from the local hardware store (my local shop had some at one time, but then stopped carrying it).

 The commonly available "green" grease I use (Lucas or Blaster brand usually) is a medium-grade grease (NLGI #2). It is too thick to use throughout a vintage Sturmey hub, such as an AW or FW. I am using this grease on the outer bearings in the main cups, and a modest amount of it in the ball ring bearings inside the ball ring. These areas of the hub respond and seal up reasonably well with the common green grease.

For the core of the hub, I use 20 weight oil. My oil of choice is, as I've said many times before, 3-in-1 "blue" bottle oil, that is, the little bottle with the word "motor" or the little drawing of a motor on it. 

 I like this combination because your oil and grease can usually be bought from the local hardware store, the grease seals in the light oil reasonably well, and the oil is thin enough penetrate into the small spaces in the center of the hub. Routine oiling frequency is reduced but not eliminated entirely. I like this combination of factors, and I think the average mechanic and user of these hubs benefits from the convenience. 

But please don't assume this is the only way to lubricate the hub. I know of advanced mechanics who prefer a full semi-fluid grease treatment and do well with it. There is more than one "right" answer to lubricating your hub. I just happen to like the ease and versatility of common green grease in the bearings and 20-weight oil in the hub core.

Sunday, February 25, 2024

Advanced Sturmey Repair: Replacing Left Hand Ball Cups on Old AW and FW Hubs


This entry discusses a somewhat more advanced repair to older Sturmey Archer hubs: removal and replacement of the left (non-drive) side ratchet ring. This part is called the "left hand side ball cup" in the old diagrams (see above - part K517).  

Why would you want to do this? It allows you to save an older hub that has left (non-drive) side cup issues, replacing the ratchet ring and bearing cup as a unit. This work applies to older Sturmey Archer AW and FW hubs that have flatted ratchets. This is a good fix if you have a pre-war AW hub that needs a refresh, for example. In the early 1960s, the hubs switched to a press-in left hand ball cup. This article refers to the earlier hubs with threaded and flatted left hand ball cups.

There are two ways to replace the non-drive side ratchet ring and bearing cup. The first is if the hub is laced into a wheel, you can use the wheel and a heavy-duty vise to spin off the ratchet ring and cup from the hub shell. The second method is if the hub is not laced into a wheel, you can use the Gentleman Cyclist ball ring tool, heavy duty-vise, and a 15-inch adjustable wrench to spin off the non-drive ratchet ring and cup.

CAUTION: This a job for the "advanced" Sturmey Archer enthusiast because it requires some heavy-duty tools and an understanding of how the older AW or FW hub works.


You'll Need:

  • Heavy-duty bench with a bolt-down vise.
  • Propane Torch
  • Loosening oil (I like Kano Kroil)
  • 15-inch adjustable wrench (if hub is not laced into a wheel)
  • Gentleman Cyclist ball ring tool (if hub is not laced into a wheel)

If the Hub is Laced into a Wheel:

  • Using the Sturmey Archer hub instructions, remove the innards of the hub so that you are down to just the hub shell and the non-drive ratchet ring/cup (called the "left hand ball cup", part no. K517 in the diagram below). Fix the hub into the vise by tightening the jaws around the flats of the left hand ball cup.


  •  Dribble some of your creeping oil inside the hub shell, focusing on the area where the left hand ball cup threads into the inner surface of the shell.
  • Gradually and evenly heat the outside of the hub shell in the area where the left hand ball cup threads in. Warm that area until you start to see little bubbles in your oil inside the hub. Caution - do not overheat the oil, hub, or spokes.
  • Let it cool. Repeat the cycle of oil, heat, and cool once or twice more.
  • Using the wheel as leverage, spin the wheel clockwise (the left hand ball cup is left-hand threaded). If the left hand ball cup will not spin off, repeat the heat/oil/cool cycle again.
  • Once the left hand ball cup is loosened, spin the wheel so that it frees from the left hand ball cup. Replace the left hand ball cup with a good cup by mounting the good cup into the vise and spinning the wheel counter clockwise until tight.


What if the Hub is Not Mounted into a Wheel?

If the hub is not mounted into a wheel, you'll also need the Gentleman Cyclist ball ring tool and a heavy-duty wrench. I like to use a 15-inch adjustable wrench.

  • Remove the hub innards from the hub. Place the Gentleman Cyclist Ball Ring Tool into the vise as you would to mount a ball ring. 
  • Put the hub shell into the vise, tightening the jaws around the flats on the left side ball cup (K517 in the diagrams above).
  • Dribble your oil into the inside of the shell, focusing the oil on the threads where the left side ball cup joins the inside of the hub shell.
  • Heat the outside of the hub shell using a propane torch evenly and gently around where the left hand ball cup threads in. Keep heating until you see little bubbles in the oil inside the hub. Let cool. Do not allow the oil to burn or smoke off.
  • Repeat the oil/heat/cool cycle once or twice more.
  • When sufficiently cool to handle (caution - hub may still be somewhat hot) mount a drive-side (right side) ball ring into the hub shell using the tool. [I assume that if you have this tool, you know how to use it to put in a drive side ball ring already.] This is part K60 in the diagrams above.
  •  Now you should have a hub shell with a left hand ball cup on one side and a right hand ball cup on the other, but without anything else in it. The hub should be resting upside down - with the drive side ball ring in the Gentleman Cyclist Tool. The non-drive side ball ring flats should be facing upward.
  • Attach your large adjustable wrench to the flats on the non-drive side cup which is facing upward. Make sure the notches of the drive side ball ring, which is facing downward, are firmly in the Gentleman Cyclist Tool.
  • Begin to turn the wrench clockwise (the non-drive side ball ring is left hand threaded). Apply gradually more and more force until the ring gives and begins to spin off. 
  • If the ring won't move even with great force, repeat the oil/heat/cool cycle for those inside threads as stated above.
  • Once loose, spin off the non-drive side cup and replace with a good cup. It will thread in counter-clockwise because it is left hand threaded.

Photos:

 Below: an illustration of the oiling the hub. This hub shell is not in a wheel, and the innards have been removed. At this point all I have is the hub shell, the left side ball cup, and the right side ball cup in place. I have dribbled oil down the inside wall of the hub and into the joint between the left hand ball cup and the hub threads.


Below: here is the outside of what I have: hub shell with both the left ball cup and right ball cup mounted. The flats of the left side ball cup are gripped in the vise jaws.
 

 I then apply the torch evenly around the base of the shell, where the oil is sitting in the left ball cup threads. I heat until the oil bubbles, but stop before it burns or smokes out. I then let it cool, and that helps draw the oil down deeper into the threads.


Once sufficiently cool, the Gentleman Cyclist tool is mounted into the vise, and the hub shell is flipped over so that the right hand ball cup/ring connects firmly to the Gentleman Cyclist tool.


A large adjustable wrench is then applied to the flats on the left hand ball cup. It's left-hand threaded, meaning I turn the wrench clockwise to loosen.

Below - the left hand ball cup finally loosens up after several heat, cool cycles with the oil. I can now turn the left hand ball cup off and replace it.


Below- after removal of the left hand ball cup, you can see the shiny areas of thread where the oil penetrated. Lots of oil in those threads is a good thing. You get the most out of your effort when the oil fully works its way down.


Below are a couple of Sturmey hubs saved in just one weekend. One is a pre-war AW with 40 holes and the other a 1950 AW with 40 holes, both great hubs for vintage English bikes.


Monday, February 12, 2024

When Was My Three Speed Bike Made? A Beginner's Guide


If you are a beginner looking to find the date of manufacture of a particular three speed bike, here are the basic ways of doing it. Let's presume you have no access to service records or the original owner and you're just finding a bike "in the wild".


  1. Look on the rear hub for a date code. Sturmey Archer hubs usually have a date code and a model stamped on the rear hub shell.

  •  "K" model imprinted on hub: 1918-1937 era. Look on the hub for a date code. Date codes with just one number date to the 1930s, with the single number being the year in that decade (e.g., "5" means 1935, "6" means 1936, etc.).
  • "AW" model imprinted on hub: 1936 or later. If the imprint is just one number, it dates to the 1930s with that number being the year in the 1930s (e.g., "6" means 1936, "9" means 1939). If the imprint has two numbers, those numbers are the month and the year (e.g., 5 73 means May 1973; 6 55 means June 1955).  If not date code at all, those date to around the time of WWII, just before to just after the war.
  • "FW" model imprinted on hub : four speed hub, 1946 or later. Date the same way as the AW hub above (look for the two number date code). 
https://blogger.googleusercontent.com/img/b/R29vZ2xl/AVvXsEgZ6uMw7lPloXTLo7gq3yHNOUjIHC-n6v2t0r6-YIcdermnsBVAs15dEdA5Ud0CC5oHWuOotz6bqbkY09_24W7s-lMK7AHBQUhCsvv8GtQ0p_cvO3WcpoOlm-oMxQ2iPa_fdtTODDEXDqs/s1600/20171119_155453.jpg
47 10 means an October 1947 hub


 2. Look at the model name and overall appearance of the bike. For Raleigh Sports bikes, visit the Headbadge website HERE for a helpful chart. For Schwinn bikes, visit the field guide HERE

Ornate graphics and serial number show this is a 1959 Schwinn


Graphics help identify a 1958 Raleigh Sports


3. Look at the serial number of the bike. For Raleigh serial numbers, visit the Headbadge website HERE. For Schwinn serial numbers, check the bottom bracket, non-drive rear dropout, or the head tube. If the serial number of a Schwinn is on the bottom bracket, it's before 1952. If the serial number is on the non-drive rear drop out, it's from 1952-1969. If the serial number is on the head tube, it's 1970 or later. See the Angelfire Schwinn serial number guide HERE. Schwinn New World models have a serial number database HERE. Post-war Schwinn Superior bikes have a database HERE.


4. Look on the front hub for a possible date code. Certain Sturmey Archer front hubs, particularly those with drum brakes or dynamos inside, have date codes. Look for two numbers, a month code and a year code (e.g., 5 52 is May 1952; 6 71 is June 1971; etc.). Note - not all front hubs have a date code, so this is approach only occasionally helpful.

02 91 means February 1991 on this hub.
 

5. What kind of Sturmey Archer shifter is present? These are not always reliable because people change shifters. But sometimes this can help. See Martin Hanczyc's guide to shifters HERE. 


An early 1950s style shifter.


Wednesday, February 7, 2024

A Little Sturmey Archer Debate on a Wednesday Evening...

https://blogger.googleusercontent.com/img/b/R29vZ2xl/AVvXsEgZ6uMw7lPloXTLo7gq3yHNOUjIHC-n6v2t0r6-YIcdermnsBVAs15dEdA5Ud0CC5oHWuOotz6bqbkY09_24W7s-lMK7AHBQUhCsvv8GtQ0p_cvO3WcpoOlm-oMxQ2iPa_fdtTODDEXDqs/s1600/20171119_155453.jpg


 Certain bike-related sources take on the feel of "gospel" in the vintage bike community, the more they are used. I think Jobst Brandt and Sheldon Brown have both reached that status. People often cite Brandt on the subject of wheel building (he was certainly an expert) and Brown for all-around vintage bike information (particularly British 3 speeds and French road bikes). I will admit to learning a great deal from Sheldon's website and from correspondences with him (which I now see as all-too-short; his presence in the hobby is missed today).

 I was recently thinking about a debate between Sheldon and Jobst over Sturmey Archer AW hubs. 

 HERE

Brandt's position is that the AW suffers a more or less fatal flaw in the design of its clutch engagement: that under heavy load in high gear, the hub can suddenly slip out of gear, freewheel forward, and hence send the rider over the bars. The problem he cites is the slight play and straight profile of the planet gear pinion pins. (This is NOT the more common issue of a badly adjusted shifter cable allowing the clutch to slip out of gear - Jobst is claiming an inherent flaw regardless of shifter chain adjustment).

Sheldon's response was that while this was theoretically true, and it may even have happened in certain extreme cases where the rider was very strong and in top gear for extended periods, that the vast majority of riders on these hubs don't have the clutch engagement problem. 

John Allen adds to the debate that the bigger problem with old AW hubs is that the shifter connection can unscrew unnoticed by the rider, allowing a hub running in normal (2nd) gear to slip into neutral. 

I am firmly in Sheldon's camp on this topic. Although the old AW's clutch mechanism is by no means perfect, the problem Jobst describes is a far, far outlier. 

First, Sheldon's reason regarding the AW attracting more casual riders is correct as a general thing. 

Second, when riding an AW in top gear, most riders (even the sportier ones) tend to "spin" rather than thrash the hub. The reason for this is that most climbing, especially hard climbing, is done in low gear rather than high gear. High gear generally is used for flat or dropping terrain, where the rider will rather quickly get into a spinning mode. Even sportier riders aren't thrashing away on high gear for extended periods at full strength. This almost seems to me to be a form of abuse of the hub, given the amount of force exerted on the hub.

Third, Jobst's use of the Sturmey SW hub as an example of Sturmey Archer is unpersuasive in undermining the manufacturer. The SW hub was a totally different design with far, far more engagement problems than the AW ever had. It's not a fair comparison.

 Fourth, history doesn't seem to bear out Jobst's claim. Millions of these hubs were made, and they were heavily used in difficult conditions all over the world. I have yet to see proof that a substantial number of people using these hubs had the problem Jobst describes. This includes many athletic club type riders who used AW hubs reliably on a regular basis. In short, I don't think history backs any claim that this high gear pinion problem was a serious and recurring thing..

Ultimately, I tend to agree with Sheldon and with John Allen on this subject. It's not that Jobst's proposed flaw is totally false (perhaps if we dug, we could find a case of it happening), but that it's a far outlier that comes nowhere close to warranting writing off the AW. The bigger problem is when the shifter cable is not properly adjusted, which allows the clutch to slip into neutral on the old AW. With proper care and adjustment, the old AW is a reliable hub. 

This all reminds me of an old discussion Jobst had with a man who was rebuilding a 1960s era Schwinn Racer. (see HERE) I think perhaps Jobst was a little too dismissive of the man's questions. The Racer, Sturmey AW, kickstand, and all, is a very practical bike, if a bit heavy. They make good commuters and utility bikes.

The lesson here is that we have our "go-to" experts whose advice has become a form of "gospel" for vintage bike enthusiasts, but sometimes it's perfectly OK to disagree.